- Published on
Automate Your Code Quality with TypeScript, ESLint, Prettier, and GitHub Actions
- Authors

- Name
- Roman Martynenko
Introduction
When we execute project in teams, every developer usually has his own understanding of properly written code. There is whole spectrum of code quality attributes so it is nearly impossible to come to some kind of team or org-level agreement and follow a single set of standards. Luckily, today we have such tools as linter and prettier which excel in static code analysis. Using such tools comes with the whole bunch of benefits:
- You no longer need to have long debates in PRs about proper formatting and styling. Prettier/linter config is the one who dictates the rules.
- Lots of potential bugs can be catched on static analysis stage. Even before code is commited.
- Considerably reduced amount of effort required from developers to keep their code nice and clean. Most of routine can be automated.
- When boring routine is eliminated, you have more room for creativity and increased cognitive resources for higher business priorities.
In this tutorial we will setup an example repository and arm it with sophisticated static analysis tooling.
What You Will Learn
- Setting Up the Environment: Preparing your development environment with the necessary tools.
- Configuring Typescript ESLint: Adding library to the project and fine-tuning basic rules.
- Adding Prettier: Implementing and pairing with ESLint
- Setting Up Pre-commit Hook: Adding extra gate for code validation
- Configuring Github Action: The last setup frontier
Setting Up the Environment
Before we dive in we need to make sure we have basic environment configuration:
- NodeJS v20.15.0 (npm v10.7.0). Highly recommend to use nvm for node versions management
- Create repository on Github and clone it locally with CLI
git clone repository_address
- Open the terminal from the new repository folder and initialize npm project
npm init -y
- Create
.gitignorefile with following content
node_modules
- Install typescript (v5.4) and some extra dependencies
npm i typescript@5.4 ts-node @types/node @tsconfig/node20 -D
- Create
tsconfig.jsonfile and place config there
{
  "compilerOptions": {
    "target": "ES6",
    "module": "commonjs",
    "strict": true,
    "esModuleInterop": true,
    "skipLibCheck": true,
    "forceConsistentCasingInFileNames": true,
    "outDir": "./dist"
  },
  "include": ["src/**/*.ts"],
  "exclude": ["node_modules"]
}
- Add start script to
package.json
"scripts": {
  "start": "ts-node src/index.ts"
}
Creating Simple Express Server
For this tutorial we will use really simple server using express library:
- Setup more dependencies
    npm install express
    npm i @types/express -D
- Create
srcdirectory andindex.tsfile inside
import express, { Request, Response } from 'express';

const app = express();
const port = 3000;

app.get('/', (req: Request, res: Response) => {
  res.send('Hello, world!');
});

app.get('/error', (req: Request, res: Response) => {
  const a = 10
  const b = 20
  res.send('This endpoint has linting issues');
  if (a == b) {
    console.log('This should be a strict equality check')
  }
});

app.listen(port, () => {
  console.log(`Server is running on http://localhost:${port}`);
});
npm start. Unfortunately, we will immidiately get Typescript error as we have invalid code in /error endpoint handler 
Of course such code is not even close to real-life scenario but we can easily fix the issue by setting constant a to 20.
app.get('/error', (req: Request, res: Response) => {
  const a = 20
  const b = 20
  res.send('This endpoint has linting issues');
  if (a == b) {
    console.log('This should be a strict equality check')
  }
});
We should now be able to run the server without any issues and see Server is running on http://localhost:5001 in the terminal.
Configuring Typescript ESLint
The next step is installing eslint package and it's typescript dependencies to our project:
npm i @typescript-eslint/parser @typescript-eslint/eslint-plugin eslint -D
Also we need to create .eslintrc file with basic setup. We also add the rule
{
  "parser": "@typescript-eslint/parser",
  "parserOptions": {
    "ecmaVersion": 12,
    "sourceType": "module"
  },
  "plugins": ["@typescript-eslint"],
  "extends": ["eslint:recommended", "plugin:@typescript-eslint/recommended"],
  "rules": {
  },
  "env": {
    "es6": true,
    "node": true
  }
}
Such setup enables recommended configuration for linting. There are a other configurations tailored for specific technologies (e.g airbnb, alloy, facebook, shopify etc.) but for simplicity we will keep default recommended config for now.
Also we will add helper script to package.json:
"scripts": {
  "start": "ts-node src/index.ts",
  "lint": "eslint --ignore-path .eslintignore src/**/*.ts"
},
Adding new ESLint rules
ESLint configuration is very flexible and supports hundreds of rules. Let's add simple rule to our .eslintrc file
"rules": {
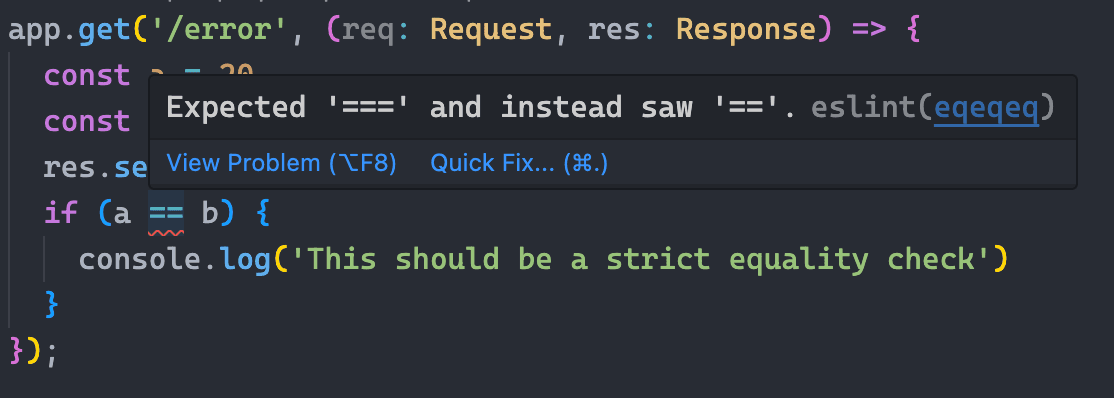
"eqeqeq": "error"
},
This rules forces type-safe equality operators === and !== instead of == and !=. We can now catch the issue with
npm run lint

Using ESLint extension in your index
Most of popular IDEs have extensions for ESLint integration. You can easily find instructions fro your favourite code editor. It is highly recommended to enable integration as it provides linting errors highlighting and some extra functionality like rule hints and automatic fixes.
- VSCode. Download (extension)[https://marketplace.visualstudio.com/items?itemName=dbaeumer.vscode-eslint]
- Webstorm. ESLint is built in. You just need to (enable)[https://www.jetbrains.com/help/webstorm/eslint.html] it.
- Sublime Text. Install (plugin)[https://packagecontrol.io/packages/ESLint]
Fixing ESLint errors
First, let's add new request handler to our express server:
app.get('/animals/:id', (req: Request, res: Response) => {
  const { id } = req.params;
  if (id === '1') {
    return res.send({ animal: 'cat' });
  } else {
    return res.send({ animal: 'dog' });
  }
});
and extra ESLint rule that will catch an issue in new handler:
"rules": {
  "eqeqeq": "error",
  "no-else-return": "error"
},
npm run lint again we will get two errors: 
There are several ways to fix them. First and most obvious is to change code manually. While it is not a big effort in our example application as we have only one issue so far, it can become a pain in a butt when we try to add linting to an existing project with tones of issues. Luckily, there is another way to fix issues using eslint command with --fix flag:
eslint --fix --ignore-path .eslintignore src/**/*.ts
We can now see that no-else-return issue was solved but equality operator issue (eqeqeq) wasn't. It happens because not all of the rules support autofix due to various reasons. (Here)[http://eslint.org/docs/rules/] you can find the list of rules that support autofix - they are marked with wrench icon. Let's fix the remaining issue manually and continue with prettier setup.
Adding Prettier
After setting up ESLint, we'll now integrate Prettier to handle code formatting. While ESLint focuses on code quality rules, Prettier is dedicated to code styling and formatting.
Installing Prettier
Let's install Prettier and ESLint-related Prettier packages:
npm i prettier eslint-config-prettier eslint-plugin-prettier -D
prettier: The core Prettier libraryeslint-config-prettier: Disables ESLint rules that might conflict with Prettiereslint-plugin-prettier: Runs Prettier as an ESLint rule
Configuring Prettier
Create a .prettierrc file in your project root:
{
  "semi": true,
  "trailingComma": "es5",
  "singleQuote": true,
  "printWidth": 100,
  "tabWidth": 2,
  "endOfLine": "auto"
}
Now, let's update our .eslintrc file to integrate Prettier with ESLint:
{
  "parser": "@typescript-eslint/parser",
  "parserOptions": {
    "ecmaVersion": 12,
    "sourceType": "module"
  },
  "plugins": ["@typescript-eslint", "prettier"],
  "extends": [
    "eslint:recommended",
    "plugin:@typescript-eslint/recommended",
    "prettier"
  ],
  "rules": {
    "eqeqeq": "error",
    "no-else-return": "error",
    "prettier/prettier": "error"
  },
  "env": {
    "es6": true,
    "node": true
  }
}
Adding Prettier Scripts
Add the following scripts to your package.json:
"scripts": {
  "start": "ts-node src/index.ts",
  "lint": "eslint --ignore-path .eslintignore src/**/*.ts",
  "lint:fix": "eslint --fix --ignore-path .eslintignore src/**/*.ts",
  "format": "prettier --write \"src/**/*.ts\""
}
Now we can format our code with:
npm run format
Let's test our Prettier setup by adding some badly formatted code to our index.ts file:
app.get('/badformat', (req: Request,res:Response) => {
    const message    = 'This endpoint has formatting issues';


    return res.send({message,
        timestamp: new Date()});
});
Running npm run format will automatically fix the formatting issues in this code block.
Setting Up Pre-commit Hook
To ensure code quality before committing code, we'll use husky and lint-staged to run linting and formatting automatically.
Installing Husky and Lint-Staged
npm i husky lint-staged -D
Configuring Lint-Staged
Add a lint-staged configuration to your package.json:
"lint-staged": {
  "*.ts": [
    "eslint --fix",
    "prettier --write"
  ]
}
Setting Up Husky
Initialize Husky:
npx husky install
Add a script to enable Husky in package.json:
"scripts": {
  "start": "ts-node src/index.ts",
  "lint": "eslint --ignore-path .eslintignore src/**/*.ts",
  "lint:fix": "eslint --fix --ignore-path .eslintignore src/**/*.ts",
  "format": "prettier --write \"src/**/*.ts\"",
  "prepare": "husky install"
}
Create a pre-commit hook:
npx husky add .husky/pre-commit "npx lint-staged"
Now, whenever you try to commit code with formatting or linting issues, the pre-commit hook will automatically fix them or prevent the commit if there are unfixable issues.
Configuring GitHub Actions
The final step is to set up GitHub Actions to run our linting and formatting checks on every push and pull request.
Creating GitHub Actions Workflow
Create a directory .github/workflows in your project root:
mkdir -p .github/workflows
Create a file named code-quality.yml in this directory:
name: Code Quality

on:
  push:
    branches: [ main ]
  pull_request:
    branches: [ main ]

jobs:
  lint-and-format:
    runs-on: ubuntu-latest
    steps:
      - uses: actions/checkout@v3

      - name: Setup Node.js
        uses: actions/setup-node@v3
        with:
          node-version: '20'
          cache: 'npm'

      - name: Install dependencies
        run: npm ci

      - name: Run ESLint
        run: npm run lint

      - name: Check formatting with Prettier
        run: npx prettier --check "src/**/*.ts"

  build:
    runs-on: ubuntu-latest
    needs: lint-and-format
    steps:
      - uses: actions/checkout@v3

      - name: Setup Node.js
        uses: actions/setup-node@v3
        with:
          node-version: '20'
          cache: 'npm'

      - name: Install dependencies
        run: npm ci

      - name: Build TypeScript
        run: tsc
This workflow will run ESLint and Prettier checks whenever you push to the main branch or create a pull request.
Conclusion
In this tutorial, we've set up a comprehensive code quality infrastructure using:
- TypeScript for type safety
- ESLint for code quality rules
- Prettier for consistent code formatting
- Husky & Lint-Staged for pre-commit hooks
- GitHub Actions for continuous integration
With this setup, you can ensure:
- Consistent code style across your team
- Early detection of potential bugs and code issues
- Automated code formatting
- Continuous code quality checks in your CI/CD pipeline
This approach significantly reduces the time spent on code style debates during code reviews and allows your team to focus on business logic and functionality instead.
Additional Resources
Remember, the goal of these tools isn't to make your development process more complex, but to simplify and automate the mundane aspects of coding, allowing you to focus on creating value with your code.